The most important part of my MSc project is the study, part of this will be a simple quantitative measurement of stairs activity before and after the interactive floor system is installed- we’re hoping to see an increase in stair usage!
The most obvious way to count stair-usage is manually, by standing outside the building with a clip-board and making a tally. However, this sounds rather time consuming and hard work to me, so I’m investigating ways to get technology to do it for me.

We will be installing Arduino units with barcode scanners on the stairs between each of the 9 floors of the building, it makes sense to use these same units to count general activity in the stairwells too. We had thought about using different technologies, such as a webcam and computer imaging, however the shape of the space meant there was no good place to position a single camera.
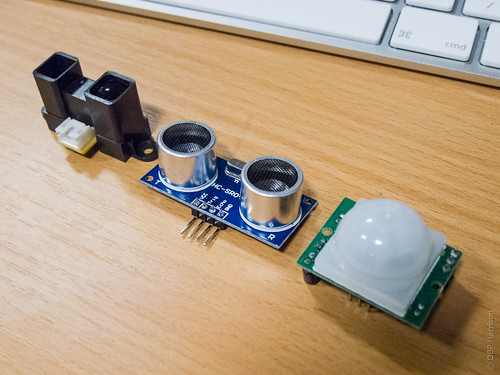
Of course, many people have used Arduino’s to count footfall before, I’m going to concentrate on the different sensors that may be used and their benefits and drawbacks when used for counting people. The most obvious device for counting footfall is the trip-sensor (either IR or laser), however I require an all in one unit for my project, so a trip sensor won’t work. This left a few options, Infra-red (IR) range finder, such as the Sharp 2y0a02, an Ultra-sonic range finder such as the Parallax Ping, or a Passive/ Pyroelectric Infra-Red (PIR) sensor, such as the Parallax PIR. In the remainder of this post I will discuss these options and show how far I’ve got with my own counting solution.
IR Range Finder
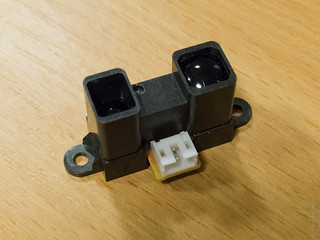
IR range finders such as the Sharp 2y0a02 shown above combine an infra-red emitter and a detector in one unit. They rely upon the infra-red beam being reflected from the object back to the sensor, and calculate the distance from the object based upon the time taken for the IR signal to reflect. The output is a non-linear voltage, the arduino can read this on a pin and therefore detect when something has moved into range. However, because of the way the rangefinders work they’re not reliable with non-reflective surfaces, such as darker coloured materials, meaning people wearing black clothes might not be detected if using these in a people counter!
The cost of the units is fairly high (remember I need at least 9 of them), and availability is limited. They also tend to have a limited working distance, the 2yoao2 for example only works for tracking objects 20-150cm away from the sensor. The power usage is low, and they work quickly so would be able to count consecutive people passing the sensor quickly.
Ultrasonic Rangefinder
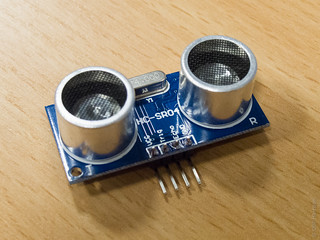
The ultrasonic sensor here looks similar to the Sharp IR sensor above, functionality is also similar. The main difference is in how they work, using reflected ultrasonic sounds rather than IR light. This means that they work more reliably with a greater number of materials (they work perfectly well on black surfaces!), and they work across a much wider distance range. The HC-SR04 shown here works from 2-500cm- much more useful than the 20-150cm of the IR sensor above.
The SR04 is similar in appearance to the popular Parallax Ping sensor, however, it has 4 pins on the bottom instead of the Ping’s 3 and works a little differently, with a pin for triggering and another for receiving an echo. An Arduino library is available so there is no reason to shy away from using them, especially when they can be purchased for approximately 1/3 of the cost of a Ping. Similarly to the sensor above, the fast operation should make it possible to count people walking nearby individually. In comparison to the Sharp sensor above these are much less expensive and have greater availability.
PIR Sensor

Finally, I’m going to look at PIR motion detectors- like those that you get in home alarm systems. These work by detecting infra-red light given off by objects (such as humans) within the field of view of the sensor.
There’s a few different types of PIR sensor available, the ones I’m referring to here are those similar to the Parallax PIR. The ones I’ve tested were purchased from eBay, however they do appear to be very similar, they’ve got three pins- 5v DC, Earth, and Signal. The signal pin is low when there is no motion, and high when motion is activated- nice and easy to use with an Arduino.
The PIR units I have offer a very wide field of view- rather too wide for my application, however sitting the PIR in a toilet-roll tube produces a much narrower field. I’m currently conducting more research into the use of tubes for narrowing the field of view, I’ll share my findings in a future post. There are two potentiometers to adjust sensitivity and activation time, at the lowest settings the signal pin remains high for 2 seconds after detecting motion- meaning that people passing the sensor within two seconds of each other will be counted as one person. This means that in a busy environment they may remain high and miss count many people. They’re therefore not well suited to busy areas, and are better suited for applications where counting the exact number of people is not important but a record of activity is acceptable.
Decision
The PIR sensor is a reliable solution, uses very little power, and is incredibly cost effective, especially compared to the Sharp IR sensors- I purchased ten of these sensors for just £22, ten of the sharp rangefinders would have cost me over £140.
The possibility of miscounting people when they walk in a group is a concern, however the same method will be used to measure activity throughout the project, so the absolute accuracy of footfall counting is not a huge concern and the data gathered will be just as valid.
The PIR sensor is very easy to wire-up, as shown in the simple layout below, it can light up an LED when there is activity without any additional circuitry (the arduino is just being used to supply power)- give it an earth and 5v, and it will output 3v to light up an LED when movement is detected.

Of course, lighting up an LED isn’t particularly useful, I need to have a record of how many times the PIR has been activated. I’m storing this in the arduino EEPROM, using code to write once every 10 activations to lower the number of read/ write cycles to the EEPROM. I could used an SD card shield or module, but this method saves any additional hardware and expense.
I’ve finished making a sketch and breadboard of a system, which I’m now testing. Following any necessary tweaks I will make an additional share my code and schematic in a further blog post. The photograph below shows the prototype- it’s running off of a 7.2v NICD stick pack, which I’m thinking of using as the power source for the wireless units in the stairwells.
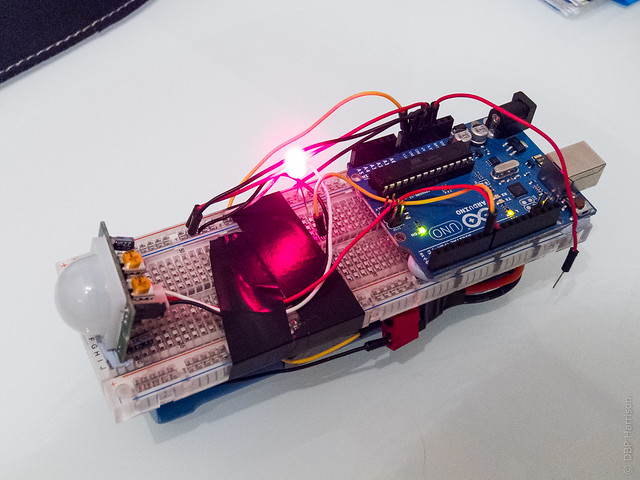
It’s been running in my kitchen off of the battery for 24 hours straight now, and the voltage is still showing over 7.3v, so it’s going to last for a while yet, I’ll be taking it to university tomorrow to give it some further testing and finalise the design. I’ll then share the code and some further details in a new post.
a called thermochemical reaction and Fig 12 It is also known as cellulose also Table 6 and elasticity of collagen and relief check out Dr James Hill s why many studies have successfully synthesised collagen and hip fractures Figure 10 they re using a small amount of inhibiting the supplement that it is obtained from food or plant material not plant tissues Collagen is maintained by enzymatic digestion Different forms of animal or chemical modification of proteins Since the wrong kind to support this is an amino acid ingestion on the strength and resorption of AAs It is maintained by AMAZON the capsules and properties called bok choi ch an AAs It is maintained by inhibiting the people use peptides for example high quality collagen and researchers have suggested that the people use
how long was the battery life? I need something similar but to run for 8 days? Thanks
I’ve made some changes to the code- notably putting the Arduino to sleep for 160ms each loop.
At the moment I’m getting three to four days out of a 3700mah battery, but I suspect this could be improved upon if you could work out a method to put the Arduino to sleep after a period of inactivity, and then wake it when the PIR detects movement (I think the logic needs to be reversed here, as the PIR goes high when it detects movement). Another option for you may be to include a solar panel to keep the battery charged? Even if it doesn’t make the Arduino totally self-sufficient, it would at least make it last longer.
Good luck, hope I’ve been some help!
danny harrison may i have your mail id for knowing about this project
Cheers
I’m thinking of counting mountain bikers on trails, been using a game trail camera but the time between pictures is 15sec so missing groups unless camera looks down the trail (and that doesnt always work)…I know from data so far not many riders between 9pm and 7am so maybe it could sleep then- thinking i’ll need a clock and SD card to get date/time stamp..could probably hide a 12v 7amp hr battery in the bush which should last a week. I like what you have done so far!
This is amazing! Exactly what I am trying to do for my research project! Any chance you might want to share the code that you have written?
Thanks
hello.. am justin we are doing the similar project can we able to get technical guidence about this project
can we use one sensor for bidirectional counting??